|
I have followed the techniques described below in making my trees. Lynn Gobin was a member of the now-disbanded West Side Lumber Co. Model Railroad Club of Rochester, MN. Their web site is still on line. Click their logo to visit it. The article below is copied from their site because I do not know how much longer their site will remain active. Many thanks to Lynn Gobin for giving me permission to publish his article here. You can visit Lynn's current model railroad work at his personal web site, the Zumbro Valley and Western.
I have added a few comments on my experience with Lynn's techniques at the end of this page
Tree Construction
|

 Ground
foam Ground foam represents the leaves of the tree. You can
certainly use Woodland Scenics ground foam, but I prefer AMSI. (Your
favorite hobby store can order AMSI ground foam from Walthers.) I think
AMSI ground foam is lighter and fluffier than Woodland Scenics. And, in
my opinion, AMSI ground foam colors are more muted and more realistic
than Woodland Scenics. For any tree, mix different colors and textures
of ground foam. Remember, not all the leaves on a tree (or the sides of
an individual leaf) are all exactly the same size and color. I’ve
included a chart of the colors and texture mixes I use.
Ground
foam Ground foam represents the leaves of the tree. You can
certainly use Woodland Scenics ground foam, but I prefer AMSI. (Your
favorite hobby store can order AMSI ground foam from Walthers.) I think
AMSI ground foam is lighter and fluffier than Woodland Scenics. And, in
my opinion, AMSI ground foam colors are more muted and more realistic
than Woodland Scenics. For any tree, mix different colors and textures
of ground foam. Remember, not all the leaves on a tree (or the sides of
an individual leaf) are all exactly the same size and color. I’ve
included a chart of the colors and texture mixes I use.| Species | Parts | AMSI Ground foam color/texture | AMSI catalog number |
| Oak | 1 1 1/4 |
Olive Medium Grass Green Medium Olive Fine |
432 442 431 |
| Silver Maple | 1 1/4 1/16 |
Grass Green Medium Grass Green Fine Spruce Fine |
442 441 551 |
| Elm | 1 1/4 |
Medium Tree Texture Grass Green Fine |
207 441 |
| Ash | 1 1/4 1/8 |
Grass Green Medium Grass Green Fine Yellow Green Fine |
442 441 411 |
| Cottonwood | 1 1/2 1/4 |
Olive Medium Eucalyptus Medium Olive Fine |
432 562 431 |
| Sycamore | 1 1/2 1/4 |
Gray Green Medium Olive Medium Olive Fine |
472 432 431 |
| Poplar | 1 1 |
Spruce Fine Grass Green Fine |
551 441 |
| Aspen | 3 1 1 |
Grass Green Fine Spruce Fine Timber Products Meadow Green Course, #102-12 |
441 551 - |
| Birch | 1 1 1/2 |
Medium Tree Texture Grass Green Fine Olive Fine |
207 441 431 |
Assembly Instructions
- Prepare the tree trunk armature by trimming it to size. Optionally (but preferably for larger trunks), "peg" the bottom of the trunk with a small wooden dowel or a nail so you have something to stick and glue your tree into your layout.
- Prepare your ground foam mixture, and put a cupful in a shaker container with 1/4" holes.
- With your fingers, tease out a golfball-sized chunk of Polyfiber into a thin sheet.
- Cut out a postage stamp-sized (or smaller) piece of the Polyfiber sheet. With two tweezers, tease out this piece of Polyfiber until it is as thin, as wispy, and as lacy as you can possibly make it.
- Using the tweezers, pull the Polyfiber piece onto an individual branch of the tree. If you are using an armature of a natural material like sage brush, you won’t need to glue the Polyfiber to the armature. Natural materials have enough surface texture to grab and hold the Polyfiber in place. Manufactured armatures, however, like those made from cast metal or plastic, might be too slippery, and sometimes need just a touch of some sort of adhesive to hold the Polyfiber.
- Repeat steps 4 and 5 until all of your branches are covered with the Polyfiber. Remember that when you look up through the branches of a real tree you see mostly blue sky. So on your model tree, leave plenty of empty space, and maybe a "dead" branch or two.
- Fast path alternative: Instead of cutting, teasing, and pulling small pieces of Polyfiber onto your tree armature, take the sheet of Polyfiber from step 3 and drape it over the entire tree. Tease the Polyfiber around the branches.
 Please use a spray booth or an
appropriately rated mask or respirator during this step! (I use
both.) Spray the Polyfiber foliage base with clear enamel or
lacquer. Set aside and let dry for at least 15 minutes. This will
ensure that the Polyfiber sticks to the armature. The enamel or
lacquer also stiffens the Polyfiber, thus preparing the fiber to
receive the ground foam.
Please use a spray booth or an
appropriately rated mask or respirator during this step! (I use
both.) Spray the Polyfiber foliage base with clear enamel or
lacquer. Set aside and let dry for at least 15 minutes. This will
ensure that the Polyfiber sticks to the armature. The enamel or
lacquer also stiffens the Polyfiber, thus preparing the fiber to
receive the ground foam.
- Liberally spray the Polyfiber foliage base with hair spray, avoiding, if possible, those parts of the trunk and branches you don’t want covered with ground foam. Immediately go to the next step!
- Turn your tree upside down and sprinkle the ground foam mixture onto the still-wet-with-hair-spray Polyfiber. Cover the bottom side of the foliage base on each branch. Then, turn your tree right-side up and finish sprinkling the foam mixture onto the tree. Stop sprinkling the ground foam just as the Polyfiber starts to "disappear."
- Suggestion: Sprinkle the ground foam over a grocery bag or some newspaper. The "over sprinkle" can be reused on other trees.
- Tap off the extra ground foam and lightly spray with hair spray. Let dry for at least 15 minutes.
- Using your scissors, trim off any stray Polyfiber strands.
- Lightly spray one last time with hair spray.
- Plant, and stand back and marvel at your creation!
Tips
Use a darker green ground foam on the underside of the foliage and
a light sprinkling of yellow or yellow-green on the top of the
foliage. These add shadow and highlight to the foliage and provide a
greater sense of depth.
| I can’t stress enough how important it is to tease out the
Polyfiber as much as you possibly can. Your goal should be to build
a tree that you can see through.
| Vary the color and texture of your ground foam mixtures, certainly
from species to species, but also from tree to tree.
| Expect to spend a lot of time with each tree. Although relatively
simple to do, this technique can require up to an hour per tree.
Putting the Polyfiber on the armature is time consuming and,
frankly, boring. But sprinkling on the ground foam is quick, fun,
and rewarding! That’s when your tree really takes on life!
| If you’re making a bunch of trees all at once, try building them
all one step at a time. For example, prepare all the trunks, then
fiber all the armatures, and so on.
| And one last reminder: please use a spray booth or a respirator
when using spray enamel or lacquer! | |
![]()
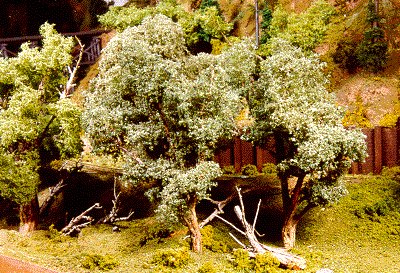
I have built two sets of trees. I had some white polyfibre when I built the first set, and used some Hunter Green spray paint to color it. The polyfibre for the the second set came from the Woodland Scenics Moonshine Still kit and was already black. The black polyfibre definitely gives a better appearance, because it seems to disappear as the "leaves" are added and does not give such a dense green appearance. Also, I found that a gentle touch with the application of the leaves is important. Too many leaves gives a fuzz ball appearance, whereas a lighter covering, where the black polyfibre just begins to fade into the background, is more authentic looking (at least to my eye).
This page last updated 01/15/2007